2022년 12월 24일 토요일

Access Linux Samba server from windows client

 https://learn.microsoft.com/en-us/troubleshoot/windows-client/networking/cannot-access-shared-folder-file-explorer


1. install smb 1.0 client.

2.   enable insecure guest logins

  1. Go to Start.

  2. Go to Search, enter the word gpedit.msc, and then press Enter.

  3. Go to Computer Configuration > Administrative templates > Network > Lanman Workstation.

  4. From the right-side pane, double-click Enable insecure guest logons.

  5. Select Enabled, and then press Enter.

ESXi how to update

1 . download update

2. put a update file to localdata store directory

3 use command below

esxcli software vib update -d "PATH TO A PATCH"

2022년 12월 23일 금요일

VMware ESXi 7.0.3 Passthrough PCI issues


*** BELOW WORK AROUND SOLUTION STILL NOT WORKING 

1. Passthrough setting not persist. 

https://tinkertry.com/vmware-vsphere-esxi-7-gpu-passthrough-ui-bug-workaround
https://williamlam.com/2020/06/passthrough-of-integrated-gpu-igpu-for-standard-intel-nuc.html

Work around solution is releasing video card usage of ESXi host
by doing this work around ESXi won't display anything to monitor or local display device.
It can be turn on later.
 
add setting in advanced option in vm
hypervisor.cpuid.v0 = FALSE
pciPassthru0.msiEnabled = FALSE
pciPassthru.use64bitMMIO = TRUE 
  
SSH to ESXi host, use below command to release graphic card from ESXi host. 
esxcli system settings kernel set -s vga -v FALSE
 
below command to get pci info: 
lspci -p 

add pci info to /etc/vmware/passthru.map  
# NVIDIA
#10de ffff bridge false <= commented out
# GRAPHIC Cards AMD
1002 6818 d3d0 default
1002 aab0 d3d0 default
 
# GRAPHIC Cards NVIDIA 
10de  128b  d3d0     default
10de 0e0f d3d0 default


2022년 10월 20일 목요일

Linux Grub2 boot order change, temorarily

======= Change boot order Temporarily

 https://www.xmodulo.com/change-default-boot-kernel-centos.html

Change the Default Boot Kernel Temporarily on CentOS

Often times you may want to switch to a different kernel just temporarily, not permanently. Even if you do want to change the default kernel permanently, it is a good idea to try a temporary boot to a new kernel before making a permanent transition from the old kernel to a new one. That way, in case there is any kernel crash with the new kernel, you can easily fall back to the old kernel simply by rebooting.

Of course you can choose a kernel to boot interactively via GRUB menu. However, such interactive control is not always available, for example, when you are booting over SSH remotely.

Here is how to change the default boot kernel temporarily from the command line. I assume that 2 is the numeric GRUB menu entry value of a kernel that you want to boot into during the next boot session. Replace the number with your own.

On CentOS 7:

[root~]# grub2-reboot 2
[root~]# reboot

On CentOS 6:

[root~]# echo "savedefault --default=2 --once" | grub --batch
[root~]# reboot

Once you reboot, you will boot into a specified kernel just once. Next time you reboot, you will revert to the default kernel.


======= Change boot order permanently 

https://studysection.com/blog/how-to-change-boot-order-in-ubuntu-18-04-from-grub2-to-set-windows-as-default-launch/


Using terminal

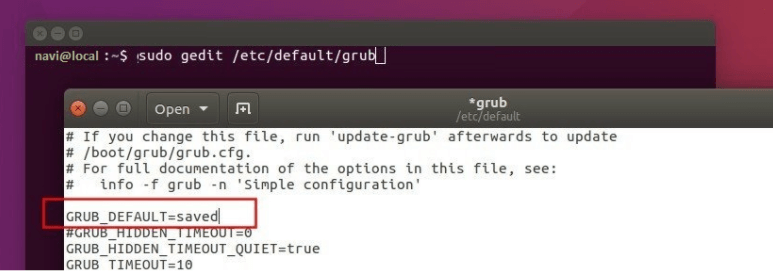
  1. Edit the configuration file via command:
    # sudo gedit /etc/default/grub
    Now, change the line GRUB_DEFAULT=0 to GRUB_DEFAULT=saved
    and now save the file.
    ubuntu1
    In Ubuntu, use the command below to edit the Grub configuration file:
    # sudo nano /etc/default/grub
    And save changes in this file.
  2. To apply the configuration changes you need to run the Update grub command :
    # sudo update-grub
  3. Finally set a default boot OS simply using the below command:
    # sudo grub-set-default NUMBER
    Boot entries start from 0. If the Windows Boot Manager is the second entry, so the NUMBER is
    ubuntu2
People having good knowledge of Financial accounting can get an Accounting Certification Exams from StudySection to increase their chances of getting a job in this field. You can get a foundation level certification if you are new to Financial accounting or you can go for advanced level certification if you have expert level skills in Financial accountin

2022년 8월 23일 화요일

VNC SSH Tunnel

 
ssh -L localport:host:remoteport username@serverhost

example)

connecting remote host from local desktop

ssh -L 7777:localhost:5900 USER@REMOTE_HOST


in VNC
localhost:7777 reaches out to REMOTE_HOST:5900


2022년 8월 21일 일요일

Samba Restrict File Sharing To Particular Users or Network Addresses

https://www.cyberciti.biz/faq/samba-user-network-file-sharing-restictions/

Samba Restrict File Sharing To Particular Users or Network Addresses

See all UNIX related articles/faq
All my local Linux or Unix user accounts will be able to log in to my Samba server and access share. How do I restrict access to particular users or network subnet such as 192.168.2.1/24?

You can use TCP wrappers to limit subnet access via:

Advertisement
  1. /etc/hosts.allow – This file describes the names of the hosts which are allowed to use the local INET services, as decided by the /usr/sbin/tcpd server.
  2. /etc/hosts.deny – This file describes the names of the hosts which are NOT allowed to use the local INET services, as decided by the /usr/sbin/tcpd server.
Tutorial details
Difficulty level Easy
Root privileges No
Requirements Samba server on Linux or Unix
Est. reading time 2 minutes

Samba Restrict File Sharing To Particular Users or Network Addresses

For example, allow access to smbd service inside LAN only via /etc/hosts.allow:

smbd : 192.168.2.

However, samba may or may not be built to support tcp wrappers.

hosts allow: Samba Configuration

Open your smb.conf file and add the following line to [share] to configuring Host-based share access:

[share]
  hosts allow = 192.168.2. 127.0.0.1

The hosts deny parameter has a higher priority than the hosts allow parameter. For instance:

[share]
  hosts allow = 192.168.2. 127.0.0.1
  hosts deny = router.sweet.home

valid users: Samba Configuration

Open your smb.conf file and add the following line to [share]

[share]
  valid users = user1 user2 @group1 @group2

So we can use share-based access control enables you to grant or deny access to a share for certain users and groups:

[share]
   valid users = +SAMDOM\"Domain Users"
   # block tom
   invalid users = SAMDOM\tom

read only & write only: Samba Configuration

You can also set read and write access to set of users with the read list and write list directives.

[share]
     read only = yes
     write list = user1 user2 @group1 @group2

Examples

Make [sales] share read only but allow user tom and jerry to write it:

[sales]
     comment = All Printers
     path = /nas/fs/sales
     read only = yes
     write list = tom jerry

You can also configure iptables to allow or deny access to the Samba server. See the following pages:

  1. What Ports Need To Be Open For Samba To Communicate With Other Windows/Linux Systems?
  2. Samba: Linux Iptables Firewall Configuration
  3. How to configure Samba to use SMBv2 and disable SMBv1 on Linux or Unix


https://serverfault.com/questions/683518/check-if-samba-only-works-locally 

It is probably secure, but there is no guarantee for that.

The samba service runs as a process listening at least on the TCP ports 139 and 445. By default it accepts connections from everywhere.

Your host allow/deny parameters make only the authentication impossible on these ports, but they don't forbid the connections to your samba service, which will be so attackable by different methods (for example, DoS attack or for any possible sechole in your system).

On my opinion, the best and most simple thing which you can do, if you set up samba to listen only on your internal network. It can be done with the interfaces setting in your smb.conf. For example, set an interfaces = 192.168.1.1/24, if your internal IP is 192.168.1.1 on a /24 subnet.

As an alternative, you can change your firewall settings as well. It depends on your firewall. In case of iptables, an iptables -A INPUT -j DROP ! -s 192.168.1.0/24 -m multiport -p tcp --dports 139,445 would deny every incoming connections to your samba service which originates out of your internal network.


2022년 7월 26일 화요일

Linux Firefox broken sound

 https://tqdev.com/2021-firefox-ubuntu-crackling-sound


Fix 1:

Go to about:config in Firefox and search for "media.webspeech.synth.enabled" and set it to "false" (double clicking on the entry should do it) then close Firefox. Don't forget to restart Firefox.

Fix 2:

It seems related to speech-dispatcher (some text-to-speech utility), so you can try:

killall speech-dispatcher

If the sound comes back to normal you can remove it completely (if you don't need it) with:

sudo apt remove speech-dispatcher

Don't forget to restart Firefox.

2022년 7월 19일 화요일

Google test

https://medium.com/@jgrant.esteve/google-test-compiled-from-source-c7ab87329321


 1. get google test source

git clone https://github.com/google/googletest.git
 
 
2.  cd into googletest.
cmake .. 
library files should be generated 
 
make install 
this command install header files and library to common path   
so you can include gtest header and start writing test cases for your code
 
3.  example files
#include "gtest/gtest.h"
#include "main.cpp"
   
TEST(Name, Test) {
ASSERT_TRUE(1 == 1);
}
 
 
int main(int argc, char **argv) 
{
testing::InitGoogleTest(&argc, argv);
return RUN_ALL_TESTS();
}
 
4. compile with command 
 $ g++ example.cpp -o example -lgtest -lpthread

2022년 3월 24일 목요일

Keyboard shortcut for taking selected area screenshot in Mint 20.04


Keyboard shortcut for taking selected area screenshot in Mint 20.04

 
Mate 20 does not have a keybinding for a partial screen print.
You can make one yourself.

In a terminal window type:

Code: Select all

mate-keybinding-properties
This will give you the keyboard shortcut window.

Click the add button.
Choose a name like 'partial screenprint'
Copy the following line to the command field:

Code: Select all

bash -c "sleep 0.2; mate-screenshot -a"
Click apply.

Your key is now defined but it is still disabled.
Double click on the word disabled behind your key and enter your preferred key combination. I would suggest ctrl-prtscr as shift-prtscr is already taken.

Click close and you are done.

sublime close without confirmation

  Close without confirm   Yes, you can just write a plugin to set the view as scratch and close it. Then create a keybinding for that c...